Deducer comes with facilities for the easy building of full-featured GUI dialogs, which can be accessed by writing Java code, and including it in your package. For simple dialogs, these facilities can also be accessed from R without the necessity of delving into Java.
This wiki guide will serve as a vignette for the DeducerPlugInExample package, which implements both pure R dialogs, and Dialogs built in Java using Deducer's GUI components.
Additional Resources:
Project JavaDocs | Bugs | Feature Requests
The package rJava provides an easy to use mechanism to call Java objects and methods from R. This Chapter will show you how to build, inspect, and manipulate Java objects without leaving the comfort of R. Particular focus will be paid to GUI objects.
Java is an object oriented language, meaning that almost everything is an object, and all functions (i.e. methods) are linked to objects. This is in contrast to R, which is primarily a function oriented language.
A class is a template used to create a specific type of object. For example I might have a class called Chair. This class is not an object it's self, but rather contains the recipe for creating a chair. This recipe is called a constructor, and when called creates a Chair object. It can be called many times to create a series of chairs (e.g. this chair, and that chair over there). Each one of these chairs is called an 'instance of' the original Chair class.
Classes can also be specific subtypes of other Classes. For example, our Chair class might be a subtype of the Furniture class, because all Chairs are Furniture. So when we create a new Chair object, it is also a Furniture object.
Functions are called methods in Java, and are tethered to a specific class. Methods can only be used with objects of their own class. For example, a Cheetah class might have a method run which would make the cat run, but we wouldn't be able to call that method to make a Chair run. methods can be called on subclasses though, so I would be able call a Furniture method on a Chair.
A class can also have methods are called on the class (not an instance), and which don't require an instance to run. These are called 'static methods' and can be called using the class even if no objects have been created by that class. For example, our Cheetah class might have a method getPopulation which would return the number of Cheetahs in the wild (i.e. the number of instances). This method relates to Cheetahs, but doesn't relate to any specific Cheetah, so it is a static method.
Hopefully the above sounded very familiar to you. R has an object system similar to Java called S4. Though you don't need to know to much about it, we will be using the S4 object system to work with Java classes and objects.
Lets start by making a JDialog object. JDialog is a class used to make a dialog window, and is a part of the Swing GUI library.
The first thing we need to do is create a variable representing the class. This can be done with the J function, which takes as an argument the class location, and returns a reference to that location (an S4 object of class jclassName). JDialog is located in the javax.swing Java package, so we simply need to call.
> JDialog <- J("javax.swing.JDialog")
> print(JDialog)
[1] "Java-Class-Name: javax.swing.JDialog"
Now that we have a reference to the JDialog class, we can a new object by calling the new function. new takes as its first argument a jclassName (e.g. JDialog), and any further arguments are passed to the JDialog constructor.
> myDialog <- new(JDialog)
myDialog is now a reference (of S4 class jobjRef) to an instance of JDialog. We don't see anything yet, because we have not made the dialog visible. There is a JDialog method called setVisible which we can use to make the dialog visible. Set visible takes a boolean (true/false) as a parameter. rJava transparently takes care of the conversion between R logical and Java boolean. We will go into conversions later on.
> myDialog$setVisible(TRUE)
You should now see a small empty dialog window.
"But wait" you say! This all seems sort of magical.
setVisible
Well, number 1 is sort of hard. Java is a big language, with lots of libraries and packages. If you are looking for something in plain Java, you can start by looking through the Java API JavaDocs. For things related to JGR, rJava and Deducer, you can look through the nightly generated Java docs.
Numbers 2 and 3 are easier to answer. we can list the available constructors with the .jconstructors function.
> .jconstructors(JDialog)
 [1] "public javax.swing.JDialog(java.awt.Frame) throws java.awt.HeadlessException"
 [2] "public javax.swing.JDialog(java.awt.Frame,boolean) throws java.awt.HeadlessException"
 [3] "public javax.swing.JDialog(java.awt.Frame,java.lang.String) throws java.awt.HeadlessException"
 [4] "public javax.swing.JDialog(java.awt.Frame,java.lang.String,boolean) throws java.awt.HeadlessException"
 [5] "public javax.swing.JDialog(java.awt.Frame,java.lang.String,boolean,java.awt.GraphicsConfiguration)"
 [6] "public javax.swing.JDialog() throws java.awt.HeadlessException"
 [7] "public javax.swing.JDialog(java.awt.Dialog,boolean) throws java.awt.HeadlessException"
 [8] "public javax.swing.JDialog(java.awt.Dialog,java.lang.String) throws java.awt.HeadlessException"
 [9] "public javax.swing.JDialog(java.awt.Dialog,java.lang.String,boolean) throws java.awt.HeadlessException"
[10] "public javax.swing.JDialog(java.awt.Dialog,java.lang.String,boolean,java.awt.GraphicsConfiguration) throws java.awt.HeadlessException"
[11] "public javax.swing.JDialog(java.awt.Dialog) throws java.awt.HeadlessException"
We can see that previously we called constructor number 6, which takes no arguments. Additionally a JDialog can be created with parameters representing a parent window (Dialog or Frame), a boolean representing whether the dialog is modal (blocking), and/or a String title. It can also take a graphics configuration, but it is rare that you would ever want to do that. So any of the follow commands can make a JDialog:
> JFrame <- J("javax.swing.JFrame")
> aFrame <- new(JFrame)
> anotherDialog <- new(JDialog,aFrame)
> anotherDialog <- new(JDialog,aFrame,TRUE)
> anotherDialog <- new(JDialog,aFrame,"title")
> anotherDialog <- new(JDialog,aFrame,"title",FALSE)
> anotherDialog <- new(JDialog)
> anotherDialog <- new(JDialog,myDialog)
> anotherDialog <- new(JDialog,myDialog,"title")
> anotherDialog <- new(JDialog,myDialog,"title",TRUE)
To look up what methods are available we use the .jmethods function.
> .jmethods(myDialog)
  [1] "public void javax.swing.JDialog.remove(java.awt.Component)"
  [2] "public void javax.swing.JDialog.update(java.awt.Graphics)"
  [3] "public javax.accessibility.AccessibleContext javax.swing.JDialog.getAccessibleContext()"
  [4] "public void javax.swing.JDialog.setLayout(java.awt.LayoutManager)"
  [5] "public javax.swing.JRootPane javax.swing.JDialog.getRootPane()"
  [6] "public void javax.swing.JDialog.setContentPane(java.awt.Container)"
  [7] "public java.awt.Container javax.swing.JDialog.getContentPane()"
  [8] "public void javax.swing.JDialog.setLayeredPane(javax.swing.JLayeredPane)"
  [9] "public javax.swing.JLayeredPane javax.swing.JDialog.getLayeredPane()"
 [10] "public void javax.swing.JDialog.setGlassPane(java.awt.Component)"
 [11] "public java.awt.Component javax.swing.JDialog.getGlassPane()"
 [12] "public void javax.swing.JDialog.setDefaultCloseOperation(int)"
 [13] "public int javax.swing.JDialog.getDefaultCloseOperation()"
 [14] "public void javax.swing.JDialog.setJMenuBar(javax.swing.JMenuBar)"
 [15] "public javax.swing.JMenuBar javax.swing.JDialog.getJMenuBar()"
 [16] "public static void javax.swing.JDialog.setDefaultLookAndFeelDecorated(boolean)"
 [17] "public static boolean javax.swing.JDialog.isDefaultLookAndFeelDecorated()"
...
...
...
The first 17 of 297 methods are displayed above.
We can also view the publicly accessible fields of an object.
> .jfields(myDialog)
 [1] "public static final int javax.swing.WindowConstants.DO_NOTHING_ON_CLOSE"
 [2] "public static final int javax.swing.WindowConstants.HIDE_ON_CLOSE"
 [3] "public static final int javax.swing.WindowConstants.DISPOSE_ON_CLOSE"
 [4] "public static final int javax.swing.WindowConstants.EXIT_ON_CLOSE"
 [5] "public static final float java.awt.Component.TOP_ALIGNMENT"
 [6] "public static final float java.awt.Component.CENTER_ALIGNMENT"
 [7] "public static final float java.awt.Component.BOTTOM_ALIGNMENT"
 [8] "public static final float java.awt.Component.LEFT_ALIGNMENT"
 [9] "public static final float java.awt.Component.RIGHT_ALIGNMENT"
[10] "public static final int java.awt.image.ImageObserver.WIDTH"
[11] "public static final int java.awt.image.ImageObserver.HEIGHT"
[12] "public static final int java.awt.image.ImageObserver.PROPERTIES"
[13] "public static final int java.awt.image.ImageObserver.SOMEBITS"
[14] "public static final int java.awt.image.ImageObserver.FRAMEBITS"
[15] "public static final int java.awt.image.ImageObserver.ALLBITS"
[16] "public static final int java.awt.image.ImageObserver.ERROR"
[17] "public static final int java.awt.image.ImageObserver.ABORT"
We have already seen how to call the setVisible method on out JDialog. Calling other functions is similar. Our Dialog is pretty small right now. In fact, its size is 0. Lets give it some length and width, as well as a title.
> myDialog <- new(JDialog)
> myDialog$setTitle("cool dialog")
> myDialog$setSize(200L,500L)
>
> JLabel <- J("javax.swing.JLabel")
> label <- new(JLabel,"Hi there, I'm a label")
> myDialog$add(label)
[1] "Java-Object{javax.swing.JLabel[,0,0,0x0,invalid,alignmentX=0.0,alignmentY=0.0,border=,flags=8388608,maximumSize=,minimumSize=,preferredSize=,defaultIcon=,disabledIcon=,horizontalAlignment=LEADING,horizontalTextPosition=TRAILING,iconTextGap=4,labelFor=,text=Hi there, I'm a label,verticalAlignment=CENTER,verticalTextPosition=CENTER]}"
>
>
> myDialog$setVisible(TRUE)
> myDialog$isVisible()
[1] TRUE
You should now see a window 200 pixels wide and 500 pixels long titled "cool dialog." We've also added a text label to the content of the window. Notice that we used 200L for the argument to setSize. This is because the L in R indicates that the number is an integer. Otherwise it would be numeric, which would then be converted to a Java double which the method doesn't understand.
Static methods can be called either on the class or an object, though it is recommended that the class be used.
> JDialog$isDefaultLookAndFeelDecorated()
[1] FALSE
Fields (variables specific to a particular Java class or object) can also be accessed in a natural way.
> JDialog$EXIT_ON_CLOSE
[1] 3
You may have noticed that we didn't actually pass any Frames or Dialogs to the constructor in the .jconstructors example above. Rather we gave it JFrames and JDialogs. This is okay because they are subclasses of Frame and Dialog. We can check this using the instanceof operator
> myDialog %instanceof% J("java.awt.Dialog")
[1] TRUE
> aFrame %instanceof% J("java.awt.Frame")
[1] TRUE
rJava automatically takes care of the class conversions (called casting) without any need for you to worry about it. Indeed, it works the other way too. If a java method's signature says that it returns an object of class Frame, but the object is actually a JFrame, it is automatically promoted to a JFrame and can be used as such. In some ways this could be considered an improvement on Java which normally requires you to handle the casting yourself.
Some R data types can be automatically converted to Java types when given to a method or constructor.
| R vector (length>1) | Java |
|---|---|
numeric | double[] |
integer | int[] |
character | java.lang.String[] |
logical | boolean[] |
| R vector (length==1) | Java |
numeric | double |
integer | int |
character | java.lang.String |
logical | boolean |
An R object can be converted to other basic Java data types with .jfloat, .jlong, .jbyte, .jchar and .jshort. If an R vector of length 1 needs to be passed as an array, simply wrap it in a .jarray call.
> .jfloat(1)
An object of class "jfloat"
[1] 1
> .jlong(1)
An object of class "jlong"
[1] 1
> .jbyte(1)
An object of class "jbyte"
[1] 1
> .jchar(1)
An object of class "jchar"
[1] 1
> .jshort(1)
An object of class "jshort"
[1] 1
> .jarray(1)
[1] "Java-Array-Object[D:[D@287a3"
You can do quite a bit with the above. A good place to start if/when you run into trouble is the rJava Documentation. If that fails and it is an rJava related problem, try the mailing list.
DeducerPlugInExample includes a factor analysis dialog written completely from within R. Creating simple dialogs is relatively easy, and Deducer provides an easy way to add them to the menu system. While all of the Swing GUI library is available to you when building your interface, Swing is a very general framework, designed to meet all user interface needs. Dialogs for statistical analysis and data manipulation are a very specific type of GUI, and as such, Deducer provides a number of easy to use Dialog windows and components. In the future, more components and features will become available as the system matures.
Deducer provides the following class definitions
| R Variable | Class | Description |
|---|---|---|
| DeducerMain | org.rosuda.deducer.widgets.Deducer | Deducer's main class |
| RDialog | org.rosuda.deducer.widgets.RDialog | A dialog to put widgets in |
| SimpleRDialog | org.rosuda.deducer.widgets.SimpleRDialog | A window for building simple dialogs in R |
| VariableSelectorWidget | org.rosuda.deducer.widgets.VariableSelectorWidget | Filterable list of the variables in a data frame |
| VariableListWidget | org.rosuda.deducer.widgets.VariableListWidget | A list of variables selected from a VariableSelectorWidget |
| SingleVariableWidget | org.rosuda.deducer.widgets.SingleVariableWidget | A list of a single variable selected from a VariableSelectorWidget |
| ButtonGroupWidget | org.rosuda.deducer.widgets.ButtonGroupWidget | A group of radio buttons |
| CheckBoxesWidget | org.rosuda.deducer.widgets.CheckBoxesWidget | A group of check boxes |
| SliderWidget | org.rosuda.deducer.widgets.SliderWidget | A slider |
| TextAreaWidget | org.rosuda.deducer.widgets.TextAreaWidget | An area to input text |
| TextFieldWidget | org.rosuda.deducer.widgets.TextFieldWidget | An integer, numeric, or text field |
| ListWidget | org.rosuda.deducer.widgets.ListWidget | A list of items |
| ComboBoxWidget | org.rosuda.deducer.widgets.ComboBoxtWidget | A combo box |
| ObjectChooserWidget | org.rosuda.deducer.widgets.ObjectChooserWidget | Select an object from the workspace, possibly of a specific class |
| JLabel | javax.swing.JLabel | A text label |
The first step in creating a GUI is to make a window. The SimpleRDialog class will take care of many of the details for you, and can be used without the need to jump into Java.
	testDialog <- new(SimpleRDialog)
	testDialog$setSize(300L,600L)
The above code, made a new window, then set its size 300 pixels wide and 600 pixels long. Notice that we used 300L instead of 300, this is because setSize is expecting an integer. If we then called dialog@setVisible(TRUE), we would see:
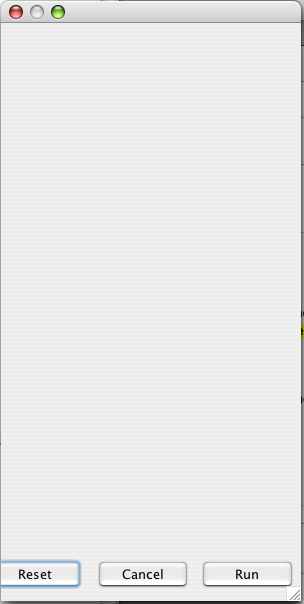
Now let's add some slider widgets to the dialog. There are many ways to layout components in a window, and each of them performs differently when the window is resized. SimpleRDialog uses AnchorLayout by default. If we want to specify the vertical position of part of a component, this is measured by the distance from the top of the window. with 1 being at the top, 500 the middle, and 1000 the bottom. Similarly, horizontal distance is measured from the left, with 1 being on the left edge, and 1000 being on the right edge.
The addComponent function is used to add a component to a window.
	slider1 <- new(SliderWidget, "Right: REL")
	addComponent(testDialog, slider1, 1, 500, 200, 1)
This code creates a new slider, and adds it to the window. The top of the slider is set to 1 (i.e. the top of the window). Its right side is set to 500 (i.e. halve way across the window). Its bottom is set to 200 (i.e. 20% of the way down). Its left hand side is set to 1 (i.e. on the left edge of the window).
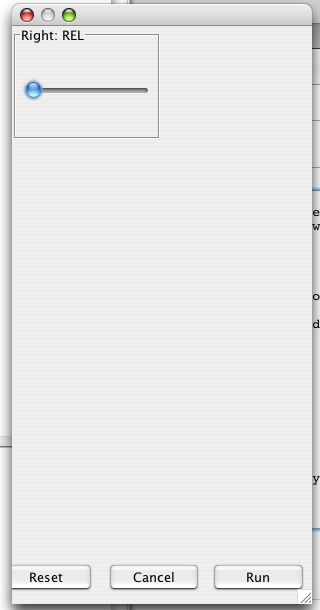
addComponent also has 4 optional parameters (topType ,rightType, bottomType, leftType) which control the behavior of the component under resizing. By default these are set to "REL" which indicates that components will be scaled relative to the size of the window. "ABS" indicates that the side should preserve the actual distance between it and the side of the window. "NONE" indicates that the position of the side should be determined by the preferred size of the component.
Let us add two new sliders identical to the first except for the scaling behavior of the right edge.
slider2<- new(SliderWidget, "Right: ABS")
addComponent(testDialog, slider2, 250, 500,450, 1,rightType="ABS")

slider3<- new(SliderWidget, "Right: NONE")
setSize(slider3,150,100)
addComponent(testDialog, slider3, 500, 500,700, 1,rightType="NONE")
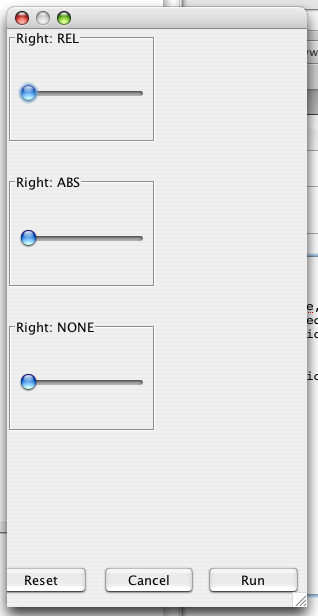
The sliders all look the same size, except when we resize the window we get different results.
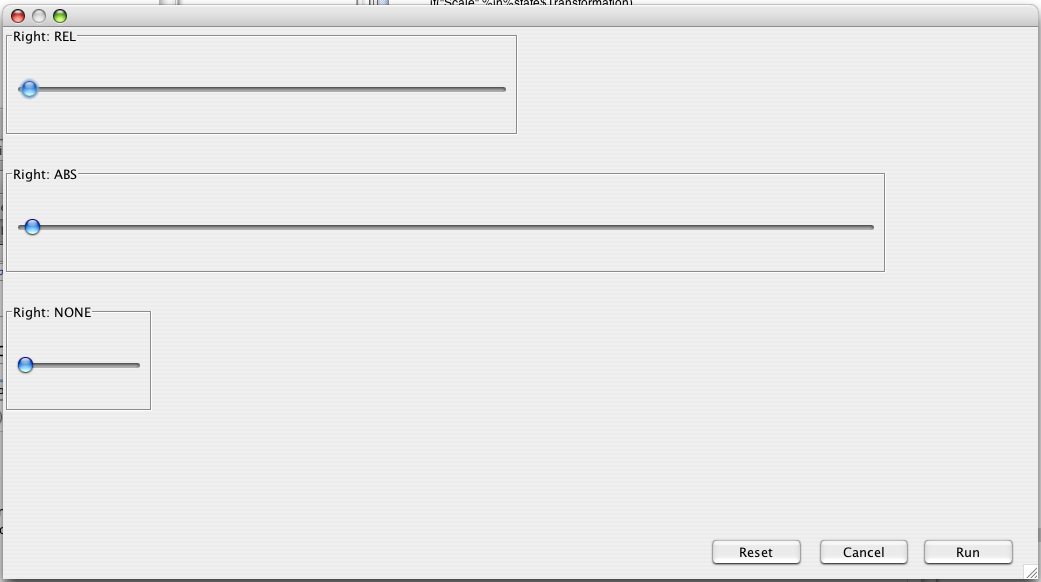
The top component gets rescaled proportional to the size of the dialog. The second one preserves the absolute distance between its right side and the right side of the window. The third one doesn't get rescaled because its size is determined by its own preferred size (set with the setSize function).
A help button referencing the wiki manual can also be added to the bottom left hand corner of the dialog.
testDialog$addHelpButton("pmwiki.php?n=Main.NewWikiPageNotYetCreated")
This option should be used if you are including the dialog that you are creating into a package. The page can be added to the wiki by creating a link for it on a page in the wiki and then editing it. Currently the help button must point to the wiki, rather than a general web address. That said, it is probably a good thing to have all the documentation in a single location. Pages on the wiki can be edited using the super secret code of 571113 .
Though setVisible can make the dialog appear, the best way to run a dialog is with the run function:
testDialog$run()
Unlike setVisible, run won't cause problems in non-JGR consoles.
Deducer has a number of built in GUI components (called widgets).
A number of methods are available for all widgets. Some important ones are:
	widget$setTitle("a title")	#sets the title of a widget
	widget$setTitle("a title",TRUE)	#sets the title of a widget and makes a titled border
	widget$getRModel()		#makes a string which if evaled is an R object representing the state of the widget
	setSize(widget,100,100)		#sets the size
When used in conjunction with SimpleRDialog, the widgets make keeping track of user selections simple. One of the necessary components to a useful statistical GUI is that the dialogs remember the users selections when he/she reenters the dialog after successful completing it. This is because statistical analysis is an iterative process. It is rare that one selects exactly the correct or most appropriate options in a dialog the first time. When the user open the dialog again to change the analysis slightly, he/she should not have to reenter every single option. Therefore, dialog memory is of primary importance in GUI design. the widgets (and SimpleRDialog) remember the user's selections, and automatically takes care of setting the dialog state to the last successful completion of the dialog (or the default selections if the dialog has not been completed).
This widget is used to select the variables of interest for analysis. Usually the user moves variables from the selector, to either a SingletVariableListWidget, or a VariableListWidget. Sometimes not all variables are valid selections for an analysis, so there is the option to only show particular types of variables. For example, if you only wished the selector to show factors, you can use:
	variableSelector <- new(VariableSelectorWidget)
	variableSelector$setRFilter("is.factor")
This widget is used to take items from a VariableSelectorWidget and put them in a list. It must be linked to a selector upon creation:
variableList<- new(VariableListWidget,variableSelector)
This widget is used to take items from a VariableSelectorWidget and put them in a list. unlike VariableListWidget, this widget is limited to taking only a single item.
variableList<- new(SingleVariableWidget,variableSelector)
A group of radio buttons. Only one may be selected at a time.
bg <- new(ButtonGroupWidget,c("a","b","c"))
A group of check boxes. An additional parameter can be passed to indicate the number of columns to use in laying out the boxes. For example the following creates a group of 4 check boxes in two columns:
boxes <- new(CheckBoxesWidget,c("box 1","box 2","box 3","box 4"), 2L)
We can also set some of the boxes to be selected by default:
boxes$setDefaultModel(c("box 1","box 3"))
A drop down combo box.
	combo <- new(J("org.rosuda.deducer.widgets.ComboBoxWidget"),c("a","b","c"))
	combo$setDefaultModel("b")
note: In future versions of Deducer, J("org.rosuda.deducer.widgets.ComboBoxWidget") will be given the shortcut ComboBoxWidget.
A continuous slider.
slider <- new(SliderWidget,c("left endpoint","right endpoint"))
A place for the user to enter text.
textArea <- new(TextAreaWidget,"title of widget")
A list
lis <- new(ListWidget,"title of widget")
Bringing all these points together we can make a dialog for factor analysis with very few lines of code.
	#make dialog
	dialog <- new(SimpleRDialog)
	dialog$setSize(500L,400L)
	dialog$setTitle("Factor Analysis")

	#add variable selector
	variableSelector <- new(VariableSelectorWidget)
	variableSelector$setTitle("data")
	addComponent(dialog,variableSelector,10,400,850,10)

	#add a list for the variables
	variableList<- new(VariableListWidget,variableSelector)
	variableList$setTitle("variables")
	addComponent(dialog, variableList,100,900,450, 420)

	#options for transforming the variables
	transBoxes <- new(CheckBoxesWidget,"Transformation",c("Center","Scale"))
	addComponent(dialog, transBoxes,500,900,670, 540)
	transBoxes$setDefaultModel(c("Scale"))

	#output options
	outBoxes <- new(CheckBoxesWidget,"Output",c("Summary","Scree Plot"))
	addComponent(dialog, outBoxes,680,900,850, 540)

	dialog$run()
This looks perfectly pretty, but doesn't actually do anything. We need to be able to translate GUI selections into runnable R code. To do this we register two functions with the dialog.
The check and run functions are R functions available in the global environment that take one parameter representing the state of the widgets upon hitting the "run" button. The check function makes sure that the selections are valid for the particular analysis. If all the options are valid, the check function should return an empty string (i.e. ''), otherwise it should return a string representing a message to be displayed to the user. The run function constructs the R call and executes it.
The state, as passed to the check and run functions is a named list. The names of each of items of the list are the titles of the widgets.
In our factor analysis example, it doesn't make sense to do a factor analysis on less than two variables, so we will write a function that will throw up a message dialog when less than two variables are in the variableList.
.factorAnalysisCheckFunction <- function(state){
	#make sure at least two variables are selected
	if(length(state$variables)<2)
		return("Please select at least two variables")
	return("")
}
Then we need to tell the dialog to call this function when it is checking validity.
dialog$setCheckFunction(toJava(.factorAnalysisCheckFunction))
Next we need to create the function which will take the GUI state and translate it into an R call.
.factorAnalysisRunFunction <- function(state){
	#print(state) #a print statement is useful for debugging

	#make formula
	form <-paste( " ~ " , state$variables[1])
	for( var in state$variables[-1])
		form <- paste(form,"+",var)

	#make prcomp call
	cmd <- paste("pr.model <-prcomp(", form, ",", state$data)
	if("Center" %in%state$Transformation)
		cmd <- paste(cmd,", center=TRUE")
	if("Scale" %in%state$Transformation)
		cmd <- paste(cmd,",scale=TRUE")
	cmd <- paste(cmd,")")

	#always print model
	cmd <- paste (cmd,"\n","print(pr.model)")

	#output summary and plot if asked for
	if("Summary" %in% state$Output)
		cmd <- paste(cmd,"\n","summary(pr.model)")
	if("Scree Plot" %in% state$Output)
		cmd <- paste(cmd,"\n","screeplot(pr.model)")

	#execute command as if typed into console
	execute(cmd)
}
Note the use of the execute function. This takes a string and executes it as if it had been typed into the console. Finally the run function should be registered with the dialog:
dialog$setRunFunction(toJava(.factorAnalysisRunFunction))
deducer.addMenu and deducer.addMenuItem add menu and menu items to the command line menu system. We then need to add items to the GUI menu bars. If we are in the windows Rgui, we use winMenuAdd and winMenuAddItem. If we are in JGR we use jgr.addMenu and jgr.addMenuItem.
deducer.addMenu("Example")
deducer.addMenuItem("Factor Analysis",,"dialog$run()","Example")
if(.windowsGUI){
	winMenuAdd("Example")
	winMenuAddItem("Example", "Factor Analysis", "deducer('Factor Analysis')")
}else if(.jgr){
	jgr.addMenu("Example")
	jgr.addMenuItem("Example", "Factor Analysis", "deducer('Factor Analysis')")
}
One thing to note is that winMenuAddItem calls deducer('Factor Analysis') and not dialog$run(). This is done so that the deducer function can handle the graphics device details. If you don't call your dialogs through the deducer function on non-JGR consoles, plotting to graphics devices may not function correctly.
We are now ready to put our dialog into a package and distribute it to the world. As a good coding practice, the dialog creation process should be put into a function, and we shouldn't go through the process of making the dialog until the user calls it. To do this we create a new function (getFactorAnalysisDialog) that returns the dialog if it is already made, otherwise is makes a new one. Besides, to add the dialog to the menu system automatically, we will define the .onLoad function with the corresponding instructions.
Putting it all together we get the following fully functional package script for making a factor analysis dialog with no Java code.
makeFactorAnalysisDialog <- function(){
	#make dialog
	dialog <- new(SimpleRDialog)
	dialog$setSize(500L,400L)
	dialog$setTitle("Factor Analysis")

	#add variable selector
	variableSelector <- new(VariableSelectorWidget)
	variableSelector$setTitle("data")
	addComponent(dialog,variableSelector,10,400,850,10)

	#add a list for the variables
	variableList<- new(VariableListWidget,variableSelector)
	variableList$setTitle("variables")
	addComponent(dialog, variableList,100,900,450, 420)

	#options for transforming the variables
	transBoxes <- new(CheckBoxesWidget,"Transformation",c("Center","Scale"))
	addComponent(dialog, transBoxes,500,900,670, 540)
	transBoxes$setDefaultModel(c("Scale"))

	#output options
	outBoxes <- new(CheckBoxesWidget,"Output",c("Summary","Scree Plot"))
	addComponent(dialog, outBoxes,680,900,850, 540)
	dialog$setCheckFunction(".factorAnalysisCheckFunction")
	dialog$setRunFunction(".factorAnalysisRunFunction")
	return(dialog)
}

.factorAnalysisCheckFunction <- function(state){
	#make sure at least two variables are selected
	if(length(state$variables)<2)
		return("Please select at least two variables")
	return("")
}

.factorAnalysisRunFunction <- function(state){
	#print(state) #a print statement is useful for debugging

	#make formula
	form <-paste( " ~ " , state$variables[1])
	for( var in state$variables[-1])
		form <- paste(form,"+",var)

	#make prcomp call
	cmd <- paste("pr.model <-prcomp(", form, ",", state$data)
	if("Center" %in%state$Transformation)
		cmd <- paste(cmd,", center=TRUE")
	if("Scale" %in%state$Transformation)
		cmd <- paste(cmd,",scale=TRUE")
	cmd <- paste(cmd,")")

	#always print model
	cmd <- paste (cmd,"\n","print(pr.model)")

	#output summary and plot if asked for
	if("Summary" %in% state$Output)
		cmd <- paste(cmd,"\n","summary(pr.model)")
	if("Scree Plot" %in% state$Output)
		cmd <- paste(cmd,"\n","screeplot(pr.model)")

	#execute command as if typed into console
	execute(cmd)
}


.onLoad <- function(libname, pkgname) {
	.registerDialog("Factor Analysis", makeFactorAnalysisDialog)
	deducer.addMenu("Example")
	deducer.addMenuItem("Factor Analysis",,".getDialog('Factor Analysis')$run()","Example")
	if(.windowsGUI){
		winMenuAdd("Example")
		winMenuAddItem("Example", "Factor Analysis", "deducer('Factor Analysis')")
	}else if(.jgr){
		jgr.addMenu("Example")
		jgr.addMenuItem("Example", "Factor Analysis", "deducer('Factor Analysis')")
	}

}
Notice that .registerDialog is used to tell Deducer how to create the dialog, and .getDialog is called by the menu functions in order to call the dialog.
Obviously, in order to achieve this the exported objects of Deducer's own namespace must be visible by our package whe it is being loaded. Therefore, Deducer should be loaded before the new package. Or preferably, the DESCRIPTION and NAMESPACE files of our package's source should define Deducer as an import.
Listeners allow you to respond to a user's interaction with your dialog. If the user selects an item, presses a button, or moves their mouse, you can make your GUI respond to that event.
As a simple example, let's start with the first few components of the "Factor Analysis" dialog that we have been working with.
	#make dialog
	dialog <- new(SimpleRDialog)
	dialog$setSize(500L,400L)
	dialog$setTitle("Factor Analysis")

	#add variable selector
	variableSelector <- new(VariableSelectorWidget)
	variableSelector$setTitle("data")
	addComponent(dialog,variableSelector,10,400,850,10)

	#add a list for the variables
	variableList<- new(VariableListWidget,variableSelector)
	variableList$setTitle("variables")
	addComponent(dialog, variableList,100,900,450, 420)
The above code makes our dialog, and adds the VariableSelector and VariableList. Instead of adding the various options below the VariableList, we will add a button.
	#Add an 'Options' button
	JButton <- J("javax.swing.JButton")
	button <- new(JButton,"Options")
	addComponent(dialog,button,500,800,600,600)
javax.swing.JButton is part of the standard Swing Library. We wish to perform an action when this button is pressed. We can do this by creating an ActionListener, and adding it to the button. First, let's create the listener:
	#Listen for the button to be pressed
	ActionListener <- J("org.rosuda.deducer.widgets.event.RActionListener")
	listener <- new(ActionListener)
All component listeners are located under org.rosuda.deducer.widgets.event , later we will enumerate all of the implemented listeners, but for now, it suffices to know that the RActionListener class responds to user actions such as button pressing.
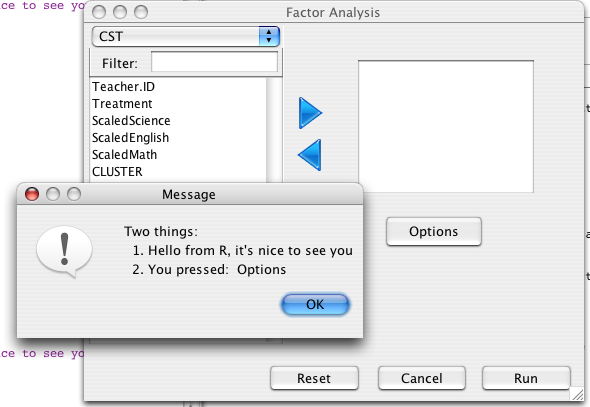
Next we need to tell the listener what to do when the button is pressed. The actionFunction is a function that takes two parameters, and displays a message to the user with a JOptionPane.
	JOptionPane <- J("javax.swing.JOptionPane")
	actionFunction <- function(cmd,ActionEvent){
		JOptionPane$showMessageDialog(dialog,paste("Two things:\n  1. Hello from R, it's nice to see you\n  2. You pressed: ", cmd))
	}
	listener$setFunction(toJava(actionFunction))
	button$addActionListener(listener)
	dialog$run()
The first line loads the JOptionPane class. actionFunction like all R functions to be called by a listener takes two parameters, the first is the type of action. in this case it will be the name of the button pressed. The second is an Java object which provides a full description of the event. Next we call setFunction on the listener and pass it our R function. It is necessary to wrap this function in toJava because the listener needs a Java representation of the function. Finally, we add the listener to the button, so that when it is pressed, we see:
The following types of listeners can call back to R functions.
| Class | Description |
|---|---|
| org.rosuda.deducer.widgets.event.RActionListener | User Actions |
| org.rosuda.deducer.widgets.event.RCaretListener | cursor movements in text fields |
| org.rosuda.deducer.widgets.event.RChangeListener | A change in the component's state |
| org.rosuda.deducer.widgets.event.RComponentListener | General component events |
| org.rosuda.deducer.widgets.event.RDocumentListener | Document Actions |
| org.rosuda.deducer.widgets.event.RFocusListener | gaining or losing focus |
| org.rosuda.deducer.widgets.event.RKeyListener | keyboard button pressing |
| org.rosuda.deducer.widgets.event.RListSelectionListener | items selected in a JList |
| org.rosuda.deducer.widgets.event.RMouseListener | mouse events (e.g. mousing over a component) |
| org.rosuda.deducer.widgets.event.RMouseMotionListener | mouse movement |
| org.rosuda.deducer.widgets.event.RMouseWheelListener | wheel actions |
| org.rosuda.deducer.widgets.event.RWindowListener | window closing, opening, etc. |
Each of these classes has setFunction and getFunction methods which allow you to set and get the R function which you wish it to call. The R function must take two parameters. The fist one is a string describing the event, the second is a Java object inheriting from Event.
These listeners can be registered with any Java Component by adding it with the appropriate function (e.g. object$addActionListener(actLis) or object$addMouseListener(MLis)). Additionally, DeducerWidgets provide a general method AddListener which will register the listener if it is appropriate for the class, and do nothing otherwise.
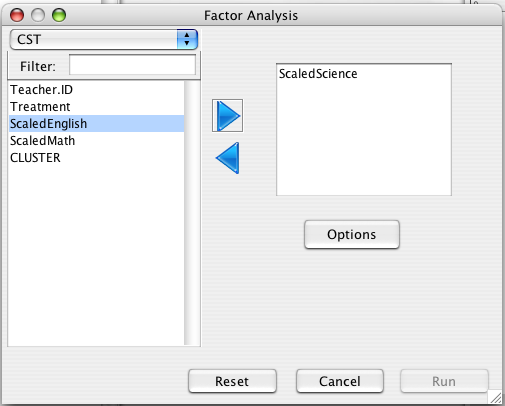
The RDialogMonitor allows you to run an R function at pre-specified intervals while an RDialog is open. For example, instead of displaying a message when the number of items in the 'Factor Analysis' variable list is less than two, we might wish to simply disable the 'RUN' button. This can be accomplished by repeatedly checking whether the list contains more than two items, and setting the run button accordingly.
First we create a new RDialogMonitor
monitor <- new(RDialogMonitor,dialog,500L)
The monitor will do nothing if dialog is not visible. Otherwise it will run a function which we specify. 500L indicates that the function should be executed every 500ms.
	runButton <- dialog$getOkayCancel()$getApproveButton()
	monitorFunction <-function(){
		if(length(variableList$getVariables())<2)
			runButton$setEnabled(FALSE)
		else
			runButton$setEnabled(TRUE)
	}
	monitor$setFunction(toJava(monitorFunction))
monitorFunction checks the number of items in the list, and disables the Run button if that number is less than two. If there are two or more, the button is enabled.
Lastly, we need to tell monitor to start running
monitor$start()
When the dialog is no longer needed, call monitor$stop() to stop the thread from running.
For example if there is only one item in the list, it will look like this:
Note of caution: The RDialogMonitor starts a new thread and executes R commands from this new thread. Since R is not thread safe, you need to make sure that the REPL is blocked while the dialog is visible (i.e. users can not enter commands directly into the console while the dialog is open). This is taken care of if you open the dialog with dialog$run(), and is also not an issue in the JGR console as it is completely Java based.
The SimpleRSubDialog class is an easy way to add lesser used or advanced options to your GUI.
SimpleRSubDialog can be used in much the same way as SimpleRDialog. let us continue with the 'Factor Analysis' example. In the listeners page we saw how to add an option button to the dialog, which gave us the following code:
	#make dialog
	dialog <- new(SimpleRDialog)
	dialog$setSize(500L,400L)
	dialog$setTitle("Factor Analysis")

	#add variable selector
	variableSelector <- new(VariableSelectorWidget)
	variableSelector$setTitle("data")
	addComponent(dialog,variableSelector,10,400,850,10)

	#add a list for the variables
	variableList<- new(VariableListWidget,variableSelector)
	variableList$setTitle("variables")
	addComponent(dialog, variableList,100,900,450, 420)

	#Add an 'Options' button
	JButton <- J("javax.swing.JButton")
	button <- new(JButton,"Options")
	addComponent(dialog,button,500,800,600,600)
Now lets make a new SimpleRSubDialog and set dialog as it's owner (or parent). All sub-dialogs should be linked to another dialog, which can be an RDialog, SimpleRDialog, or another SimpleRSubDialog. When a widget is added to a SimpleRSubDialog, its owner will keep track of it, so that the widget states are remembered and handled correctly.
	#make Options Dialog
	subDialog <- new(SimpleRSubDialog,dialog,"Factor Analysis: Options")
	setSize(subDialog,250,300)
Now we can add some widgets to the dialog:
	#options for transforming the variables
	transBoxes <- new(CheckBoxesWidget,"Transformation",c("Center","Scale"))
	addComponent(subDialog, transBoxes,1,900,300, 100)
	transBoxes$setDefaultModel(c("Scale"))

	#output options
	outBoxes <- new(CheckBoxesWidget,"Output",c("Summary","Scree Plot"))
	addComponent(subDialog, outBoxes,350,900,700, 100)
Then we add an action listener to the options button to open the sub-dialog when it is pressed:
	#Listen for the button to be pressed
	ActionListener <- J("org.rosuda.deducer.widgets.event.RActionListener")
	actionFunction <- function(cmd,ActionEvent){
		subDialog$setLocationRelativeTo(button)
		subDialog$run()
	}
	listener <- new(ActionListener)
	listener$setFunction(toJava(actionFunction))
	button$addActionListener(listener)
finally we can add a run function to the original dialog.
.factorAnalysisRunFunction <- function(state){
	#print(state) #a print statement is useful for debugging

	#make formula
	form <-paste( " ~ " , state$variables[1])
	for( var in state$variables[-1])
		form <- paste(form,"+",var)

	#make prcomp call
	cmd <- paste("pr.model <-prcomp(", form, ",", state$data)
	if("Center" %in%state$Transformation)
		cmd <- paste(cmd,", center=TRUE")
	if("Scale" %in%state$Transformation)
		cmd <- paste(cmd,",scale=TRUE")
	cmd <- paste(cmd,")")

	#always print model
	cmd <- paste (cmd,"\n","print(pr.model)")

	#output summary and plot if asked for
	if("Summary" %in% state$Output)
		cmd <- paste(cmd,"\n","summary(pr.model)")
	if("Scree Plot" %in% state$Output)
		cmd <- paste(cmd,"\n","screeplot(pr.model)")

	#execute command as if typed into console
	execute(cmd)
}
dialog$setRunFunction(toJava(.factorAnalysisRunFunction))
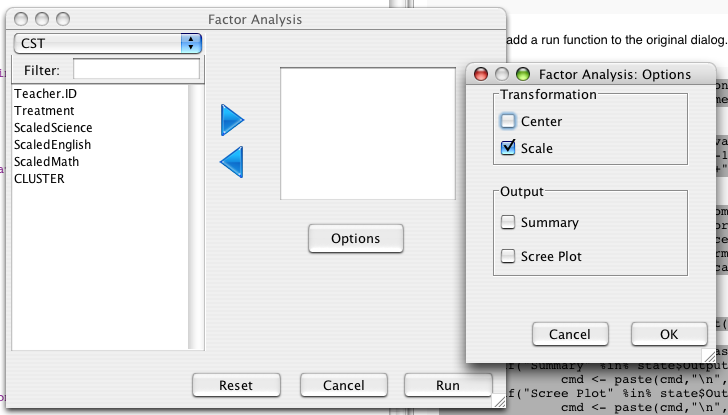
Notice that the state of the 'Transformation' and 'Output' widgets are passed to the 'state' parameter. The final result looks as follows:
You are now prepared to make simple dialogs to perform statistical analyses without leaving the comfort of R. For more complicated GUIs it may become necessary to move into Java in order to realize your vision. The next section will illustrate the inclusion of Java into R packages, and more specifically building off of Deducer and JGR.
Java code can be built and run using the package rJava. JRI.jar in the rJava package includes the necessary classes for interacting with R from within Java. In fact rJava comes with two systems for doing this. Rengine is a lower level interface, and is therefore less safe to use. REngine provides much of the same functionality, but has better error checking. This article will focus on REngine, as it is the recommended API. Note that JGR.jar (from the JGR package) also includes the REngine classes, so if that is the only part of JRI that you need, you may build your Java project against it.
The basic structure for a Java package is much the same as any other package.
-package_name
    DESCRIPTION
    -inst
        -java
            package_name.jar
    -man
    -R
        zzz.R
Like and R package. There are 'man' and 'R' directories which contain the R documentation and R code respectively. The DESCRIPTION file is the same as for any other package, and should have rJava in the Required list.
Unlike many R packages there is an 'inst' directory. This indicates to R that when the package is built, anything in the 'inst' folder should be copied verbatim into the package root directory. When rJava looks for java code, it will try to load any .jar files in the 'java' directory. These files may be named anything.
To add your jar to the classpath, two statements should be added to the .First.lib (or onLoad) function in zzz.R.
.First.lib <- function(libname, pkgname) {
    .jpackage(pkgname)
    .jengine(TRUE)
}
The .jpackage call adds all .jar files in the 'java' directory of your package to the classpath. The '.jengine' call starts the REngine, so that your Java code can call R functions. If your Java code does not import REngine (or Rengine), then this statement is not needed. Also, if your package requires Deducer, it is also not needed, as the engine is already started.
R commands can be executed from Java using the the JRIEngine class.
JRIEngine en;
try{
    en = new JRIEngine(org.rosuda.JRI.Rengine.getMainEngine());
catch(Exception e){}
REXP oneToTenR = en.parseAndEval(“1:10”);
This evaluates the R statement 1:10 and then assigns it to oneToTenR which is of class REXP. REXP objects are Java representations of R expressions. REXP objects can be converted to something that Java can more readily manipulate using a series of conversion methods. For example, we can convert oneToTenR into and array of doubles using the asDoubles method.
double[] oneToTenJava;
try{
   oneToTen = oneToTenR.asDoubles();
catch(Exception e){}
The following table enumerates the conversion functions, and what they convert too.
| Function | Converts to | Note |
|---|---|---|
| REXP.asInteger() | int | factors/logicals* ok |
| REXP.asDouble() | double | factors/integers/logical** ok |
| REXP.asString() | String | factors ok |
| REXP.asStrings() | String[] | factors ok |
| REXP.asDoubles() | double[] | factors/integers/logical** ok |
| REXP.asBytes() | byte[] | |
| REXP.asIntegers() | int[] | factors/logicals* ok |
| REXP.asList().at(int index) | REXP | for R lists and data.frames |
*NA = -2147483648 **NA=Double.longBitsToDouble(0x7ff00000000007a2L);
If your package uses Deducer, there is a convenience method (Deducer.eval) for executing R statements.
//using Deducer wrapper
REXP rVariable = Deducer.eval(“names(Prestige)”);

String[] prestigeNames;
try{
   prestigeNames = rVariable.asStrings()
} catch (REXPMismatchException e) {}
Also there is a useful method for executing R commands as if the user typed them into the console:
Deducer.execute(“print(‘I like ponies’)”);
You will need to compile your Java code into package_name.jar. You may need to compile it against JRI.jar, JGR.jar and/or Deducer.jar (found in the rJava, JGR and Deducer packages respectively), depending on which classes you use in your code. This can be accomplished in any number of ways using any Java IDE. Below is a desciption of how to do it using the command line.
1. Make a new directory with the following structure:
-src
    -package_name
        *.java          <------All of your java source code
    Deducer.jar
    JGR.jar
    JRI.jar
2. Then, in the src directory execute
javac -target 1.4 -source 1.4 -d . -classpath JRI.jar:JGR.jar:deducer.jar package_name/*.java
jar fc package_name.jar package_name/*.class
If you are using Windows, you may need to change the first line to:
javac -target 1.4 -source 1.4 -d . -classpath JRI.jar;JGR.jar;deducer.jar package_name/*.java
Then copy the newly created package_name.jar to the java directory of your package.
Auto generated Documentation on REngine and the REXP class can be found Here.Now that you have the basics of dealing with R objects in Java, the next step is to build a GUI dialog using the Swing toolkit.
There are two main toolkits for GUI development in Java, SWT and Swing. While either can be used for dialog creation, Deducer has a number of specialized Swing components specifically focused on statistical GUI creation. This page assumes a basic familiarity with Swing, and will take you through the process of building a dialog to create a scatter plot. There are many Swing tutorials available, including one written by Sun.
RDialog extends Swing's JDialog, and makes it easy to create a dialog with memory. Memory is an important aspect of a statistical analysis dialog, because it is rare that the user has specified all of the analysis options correctly the first time. Anytime a Deducer widget is added to the dialog via add, it's state is tracked, and saved when the dialog is successfully completed. Then when the dialog is re-opened, it sets the widgets' states to their saved value. This is all done transparently. The only thing that the programmer needs to do is inform RDialog when it is successfully competed.
Important Methods:
By default RDialog uses AnchorLayout as it's layout manager. Though this can be changed. The classes are located at:
import org.rosuda.JGR.layout.AnchorConstraint;
import org.rosuda.JGR.layout.AnchorLayout;
Widgets are easy to use Swing components provided by Deducer.
| Class | Description |
|---|---|
| org.rosuda.deducer.widgets.VariableSelectorWidget | Filterable list of the variables in a data frame |
| org.rosuda.deducer.widgets.VariableListWidget | A list of variables selected from a VariableSelectorWidget |
| org.rosuda.deducer.widgets.SingleVariableWidget | A list of a single variable selected from a VariableSelectorWidget |
| org.rosuda.deducer.widgets.ButtonGroupWidget | A group of radio buttons |
| org.rosuda.deducer.widgets.CheckBoxesWidget | A group of check boxes |
| |org.rosuda.deducer.widgets.ComboBoxWidget | A drop down list |
| org.rosuda.deducer.widgets.SliderWidget | A slider |
| org.rosuda.deducer.widgets.TextAreaWidget | An area to input text |
Auto-generated Documentation for each of these is available: Widget JavaDocs.
Widgets can be added just as any other component.
		SliderWidget slider = new SliderWidget("Alpha level",new String[]{"Transparent","Opaque"});
		anRDialog.add(slider, new AnchorConstraint(610, 978, 840, 460,
				AnchorConstraint.ANCHOR_REL, AnchorConstraint.ANCHOR_REL,
				AnchorConstraint.ANCHOR_REL, AnchorConstraint.ANCHOR_REL));
In the above code, a new slider is added to the RDialog anRDialog. In this case, anRDialog uses AnchorLayout, so the slider is added with an AnchorConstraint. Each of the numbers represents the distance from either the left or the top of the dialog for each side of the slider (top, right, bottom and left). Because all of the constraints are AnchorConstraint.ANCHOR_REL, the numbers represent relative positions going from 1 (left/top edge) to 1000 (right/ bottom edge). When the dialog is resized, the slider will be resized proportionally. The constraint can also be AnchorConstraint.ANCHOR_ABS, in which case the number associated with that side is the absolute number of pixels between the component's edge, and that of the dialog.
		variableSelector = new VariableSelectorWidget();
		anRDialog.add(variableSelector, new AnchorConstraint(12, 428, 900, 12,
				AnchorConstraint.ANCHOR_ABS, AnchorConstraint.ANCHOR_REL,
				AnchorConstraint.ANCHOR_REL, AnchorConstraint.ANCHOR_ABS));
The above code creates a new variable selector. Because the top and left constraints are AnchorConstraint.ANCHOR_ABS, there are 12 pixels between the left side of the dialog, and the left side of the selector. Similarly, there are 12 pixels between the top of the selector and the top of the dialog, regardless of how the dialog is resized.
Finally, the constraint can be AnchorConstraint.ANCHOR_NONE, in which case the position of the side is determined by the preferred size of the component (set with setPreferredSize).
We can make a scatter plot dialog easily using the above tools. We will extend RDialog. We will also implement ActionListener so that we can respond to the user pressing the buttons at the bottom of the dialog.
package example;

import java.awt.event.ActionEvent;
import java.awt.event.ActionListener;

import javax.swing.JOptionPane;

import org.rosuda.JGR.layout.AnchorConstraint;
import org.rosuda.deducer.Deducer;
import org.rosuda.deducer.widgets.*;


public class PlotRDialog extends RDialog implements ActionListener{

	private VariableSelectorWidget variableSelector;
	private SingleVariableWidget yaxis;
	private SingleVariableWidget xaxis;
	private SliderWidget slider;


	public void initGUI(){
		super.initGUI();


		variableSelector = new VariableSelectorWidget();
		this.add(variableSelector, new AnchorConstraint(12, 428, 900, 12,
				AnchorConstraint.ANCHOR_ABS, AnchorConstraint.ANCHOR_REL,
				AnchorConstraint.ANCHOR_REL, AnchorConstraint.ANCHOR_ABS));
		variableSelector.setPreferredSize(new java.awt.Dimension(216, 379));
		variableSelector.setTitle("Data");

		yaxis = new SingleVariableWidget("y axis",variableSelector);
		this.add(yaxis, new AnchorConstraint(121, 978, 327, 460,
				AnchorConstraint.ANCHOR_REL, AnchorConstraint.ANCHOR_REL,
				AnchorConstraint.ANCHOR_REL, AnchorConstraint.ANCHOR_REL));
		yaxis.setPreferredSize(new java.awt.Dimension(276, 63));

		xaxis = new SingleVariableWidget("x axis",variableSelector);
		this.add(xaxis, new AnchorConstraint(337, 978, 540, 460,
				AnchorConstraint.ANCHOR_REL, AnchorConstraint.ANCHOR_REL,
				AnchorConstraint.ANCHOR_REL, AnchorConstraint.ANCHOR_REL));
		xaxis.setPreferredSize(new java.awt.Dimension(276, 63));

		slider = new SliderWidget("Alpha level",new String[]{"Transparent","Opaque"});
		this.add(slider, new AnchorConstraint(610, 978, 840, 460,
				AnchorConstraint.ANCHOR_REL, AnchorConstraint.ANCHOR_REL,
				AnchorConstraint.ANCHOR_REL, AnchorConstraint.ANCHOR_REL));
		slider.setPreferredSize(new java.awt.Dimension(187, 44));
		slider.setDefaultModel(new Integer(100));

		this.setTitle("Scatter Plot");

		setOkayCancel(true,true,this);   //put Run, Reset, Cancel buttons in place, and register this as it's listener
		addHelpButton("pmwiki.php");     //Add help button pointing to main manual page
		this.setSize(555, 445);
	}

	public void actionPerformed(ActionEvent e) {
		String cmd = e.getActionCommand();

		if(cmd=="Run"){
			String xvar = xaxis.getSelectedVariable();
			String yvar = yaxis.getSelectedVariable();
			String data = variableSelector.getSelectedData();
			String alpha = new Double(((double) slider.getValue())/100.0).toString();
			if(yvar==null || xvar==null || data==null){
				JOptionPane.showMessageDialog(this, "You must specify both an x and y variable");
				return;
			}

			String command = "qplot("+xvar+", "+yvar+", data="+data+",alpha=I("+alpha+"))";

			Deducer.execute(command);		//execute command as if it had been entered into the console
			this.setVisible(false);
			completed();	//dialog completed
		}else if(cmd=="Cancel")
			this.setVisible(false);
		else if(cmd=="Reset")
			reset();
	}

}
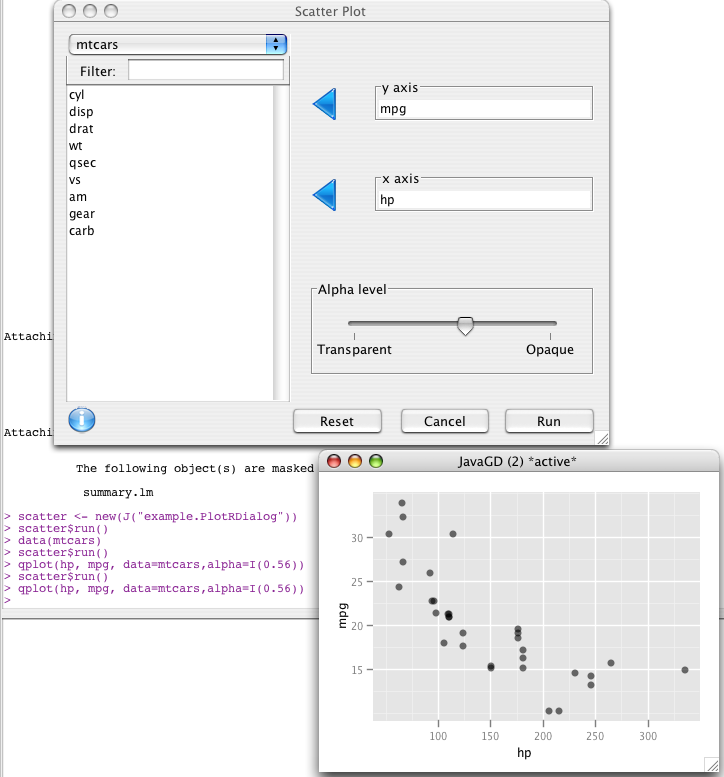
The first method (initGUI) overrides the the RDialog method, and is used to set up the four widgets. The actionPerformed method is called when the "Run", "Cancel" or "Reset" buttons are pressed. When "Run" is pressed, an call to qplot in the ggplot2 package is constructed. It is then executed using Deducer.execute.
The above Class is present in the DeducerPlugInExample package, and can be viewed with:
R> library(DeducerPlugInExample)
R> scatter <- new(J("example.PlotRDialog"))
R> scatter$run()
Below are some thoughts about the design of statistical dialogs. They are by no means definitive, or even correct.
There is definite value in resisting the urge to include every possible eventuality or user need into a single dialog. You certainly don't want this to happen. A UI should as simple and streamlined as possible, with commonly used elements at the forefront, and little used tweaks hidden (perhap in a sub-dialog).
That said, going too simple can paradoxically increase complexity. If you narrow the use of a single dialog to include only a very specific function, for example loading am SPSS dataset, then you will be forced, later down the road, to create dialogs for each specific function that was not included (i.e. for Stata, SAS, and csv data files). This can lead to a proliferation of menu items, where only one was needed (Load Data).
Think about a user sitting down to use your software. What are they trying to accomplish? What is his/her goal?
A function call is not a goal. Users don't sit down to do a t-test. A t-test is the chosen procedure to accomplish the task of comparing two distributions. t-tests, Mann-Whitney, Kolmogorov-Smirnov, etc., all relate to the same task of comparing two distributions, so they should be put in the same dialog.
It is better to cover one task very well then to cover 10 tasks poorly. It is the matter of 10 minutes to create a dialog to create a scatter plot of two variables. But it is something quite different to add options for:
If the user is likely to want to do the same action on several variables. Don't make them go through the dialog once for every variable. Make the dialog such that the action can be applied to multiple variables. If the action is an analysis format the results into a nice table (see multi.test).
Format results into easy to read tables.
Test your GUI on multiple platforms in multiple consoles.
You are not the owner of R, the user is.
Add help buttons. Feel free to add pages to this manual for your dialogs. The password for editing is the primes between 4 and 12 with no spaces. I hate spammers.
Don't be SPSS prior to 2006. Let the user resize your dialog.
If a dialog does not remember it's settings the last time it was run, it is nearly useless. Data analysis is an iterative process, it is very rare that that the user will specify exactly the right set of options the first time.
In the creation of a statistical GUI the analysis philosophy of the author is necessarily imposed on the software. By choosing what to include, what options to make default, and where to place those options, the author guides the default behavior of the user. Below are some decisions that I made that have a bearing on how Deducer is used. Many of these are open to debate.
Humans are visual creatures and best understand data when it is presented in a visual manner. This helps both in the understanding of results, and in the diagnosis of possible assumption violations.
Standard 'exact' p-values are slightly conservative. The mid p-value is a minor modification that maintains an alpha level closer to the nominal level.
R uses type II sum of squares where as most other packages use type III (SAS, SPSS).
If you have a small sample size, you have no power to detect even major violations. If you have a large sample size you will almost surely find a statistically significant violation, even if the magnitude is small.