DeducerPlugInExample includes a factor analysis dialog written completely from within R. Creating simple dialogs is relatively easy, and Deducer provides an easy way to add them to the menu system. While all of the Swing GUI library is available to you when building your interface, Swing is a very general framework, designed to meet all user interface needs. Dialogs for statistical analysis and data manipulation are a very specific type of GUI, and as such, Deducer provides a number of easy to use Dialog windows and components. In the future, more components and features will become available as the system matures.
Deducer provides the following class definitions
| R Variable | Class | Description |
|---|---|---|
| DeducerMain | org.rosuda.deducer.widgets.Deducer | Deducer's main class |
| RDialog | org.rosuda.deducer.widgets.RDialog | A dialog to put widgets in |
| SimpleRDialog | org.rosuda.deducer.widgets.SimpleRDialog | A window for building simple dialogs in R |
| VariableSelectorWidget | org.rosuda.deducer.widgets.VariableSelectorWidget | Filterable list of the variables in a data frame |
| VariableListWidget | org.rosuda.deducer.widgets.VariableListWidget | A list of variables selected from a VariableSelectorWidget |
| SingleVariableWidget | org.rosuda.deducer.widgets.SingleVariableWidget | A list of a single variable selected from a VariableSelectorWidget |
| ButtonGroupWidget | org.rosuda.deducer.widgets.ButtonGroupWidget | A group of radio buttons |
| CheckBoxesWidget | org.rosuda.deducer.widgets.CheckBoxesWidget | A group of check boxes |
| SliderWidget | org.rosuda.deducer.widgets.SliderWidget | A slider |
| TextAreaWidget | org.rosuda.deducer.widgets.TextAreaWidget | An area to input text |
| ListWidget | org.rosuda.deducer.widgets.ListWidget | A list of items |
| JLabel | javax.swing.JLabel | A text label |
The first step in creating a GUI is to make a window. The SimpleRDialog class will take care of many of the details for you, and can be used without the need to jump into Java.
	testDialog <- new(SimpleRDialog)
	testDialog$setSize(300L,600L)
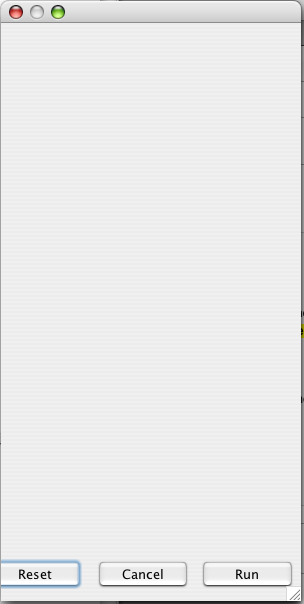
The above code, made a new window, then set its size 300 pixels wide and 600 pixels long. Notice that we used 300L instead of 300, this is because setSize is expecting an integer. If we then called dialog@setVisible(TRUE), we would see:

Now let's add some slider widgets to the dialog. There are many ways to layout components in a window, and each of them performs differently when the window is resized. SimpleRDialog uses AnchorLayout by default. If we want to specify the vertical position of part of a component, this is measured by the distance from the top of the window. with 1 being at the top, 500 the middle, and 1000 the bottom. Similarly, horizontal distance is measured from the left, with 1 being on the left edge, and 1000 being on the right edge.
The addComponent function is used to add a component to a window.
	slider1 <- new(SliderWidget, "Right: REL")
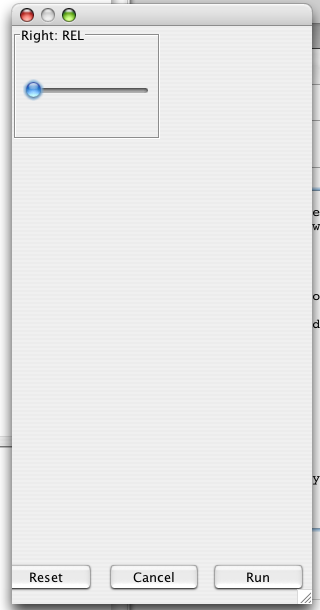
	addComponent(testDialog, slider1, 1, 500, 200, 1)
This code creates a new slider, and adds it to the window. The top of the slider is set to 1 (i.e. the top of the window). Its right side is set to 500 (i.e. halve way across the window). Its bottom is set to 200 (i.e. 20% of the way down). Its left hand side is set to 1 (i.e. on the left edge of the window).

addComponent also has 4 optional parameters (topType ,rightType, bottomType, leftType) which control the behavior of the component under resizing. By default these are set to "REL" which indicates that components will be scaled relative to the size of the window. "ABS" indicates that the side should preserve the actual distance between it and the side of the window. "NONE" indicates that the position of the side should be determined by the preferred size of the component.
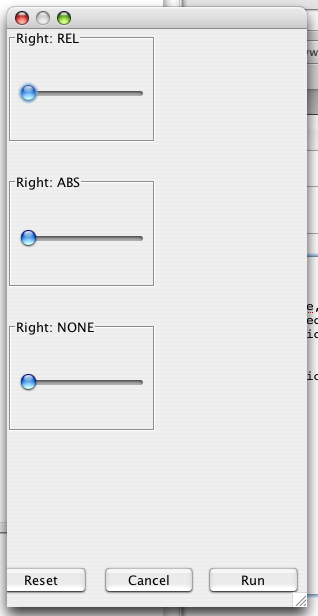
Let us add two new sliders identical to the first except for the scaling behavior of the right edge.
slider2<- new(SliderWidget, "Right: ABS")
addComponent(testDialog, slider2, 250, 500,450, 1,rightType="ABS")

slider3<- new(SliderWidget, "Right: NONE")
setSize(slider3,150,100)
addComponent(testDialog, slider3, 500, 500,700, 1,rightType="NONE")

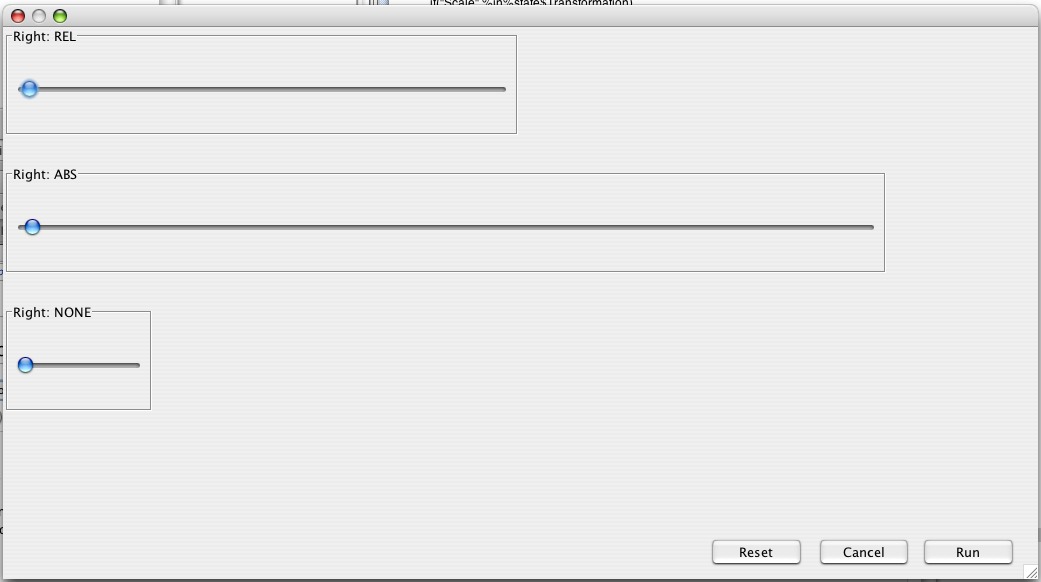
The sliders all look the same size, except when we resize the window we get different results.

The top component gets rescaled proportional to the size of the dialog. The second one preserves the absolute distance between its right side and the right side of the window. The third one doesn't get rescaled because its size is determined by its own preferred size (set with the setSize function).
A help button referencing the wiki manual can also be added to the bottom left hand corner of the dialog.
testDialog$addHelpButton("pmwiki.php?n=Main.NewWikiPageNotYetCreated")
This option should be used if you are including the dialog that you are creating into a package. The page can be added to the wiki by creating a link for it on a page in the wiki and then editing it. Currently the help button must point to the wiki, rather than a general web address. That said, it is probably a good thing to have all the documentation in a single location. Pages on the wiki can be edited using the super secret code of 571113 .
Though setVisible can make the dialog appear, the best way to run a dialog is with the run function:
testDialog$run()
Unlike setVisible, run won't cause problems in non-JGR consoles.
Deducer has a number of built in GUI components (called widgets).
A number of methods are available for all widgets. Some important ones are:
	widget$setTitle("a title")	#sets the title of a widget
	widget$setTitle("a title",TRUE)	#sets the title of a widget and makes a titled border
	widget$getRModel()		#makes a string which if evaled is an R object representing the state of the widget
	setSize(widget,100,100)		#sets the size
When used in conjunction with SimpleRDialog, the widgets make keeping track of user selections simple. One of the necessary components to a useful statistical GUI is that the dialogs remember the users selections when he/she reenters the dialog after successful completing it. This is because statistical analysis is an iterative process. It is rare that one selects exactly the correct or most appropriate options in a dialog the first time. When the user open the dialog again to change the analysis slightly, he/she should not have to reenter every single option. Therefore, dialog memory is of primary importance in GUI design. the widgets (and SimpleRDialog) remember the user's selections, and automatically takes care of setting the dialog state to the last successful completion of the dialog (or the default selections if the dialog has not been completed).
This widget is used to select the variables of interest for analysis. Usually the user moves variables from the selector, to either a SingletVariableListWidget, or a VariableListWidget. Sometimes not all variables are valid selections for an analysis, so there is the option to only show particular types of variables. For example, if you only wished the selector to show factors, you can use:
	variableSelector <- new(VariableSelectorWidget)
	variableSelector$setRFilter("is.factor")
This widget is used to take items from a VariableSelectorWidget and put them in a list. It must be linked to a selector upon creation:
variableList<- new(VariableListWidget,variableSelector)
This widget is used to take items from a VariableSelectorWidget and put them in a list. unlike VariableListWidget, this widget is limited to taking only a single item.
variableList<- new(SingleVariableListWidget,variableSelector)
A group of radio buttons. Only one may be selected at a time.
bg <- new(ButtonGroupWidget,c("a","b","c"))
A group of check boxes. An additional parameter can be passed to indicate the number of columns to use in laying out the boxes. For example the following creates a group of 4 check boxes in two columns:
boxes <- new(CheckBoxesWidget,c("box 1","box 2","box 3","box 4"), 2L)
We can also set some of the boxes to be selected by default:
boxes$setDefaultModel(c("box 1","box 3"))
A drop down combo box.
	combo <- new(J("org.rosuda.deducer.widgets.ComboBoxWidget"),c("a","b","c"))
	combo$setDefaultModel("b")
note: In future versions of Deducer, J("org.rosuda.deducer.widgets.ComboBoxWidget") will be given the shortcut ComboBoxWidget.
A continuous slider.
slider <- new(SliderWidget,c("left endpoint","right endpoint"))
A place for the user to enter text.
textArea <- new(TextAreaWidget,"title of widget")
A list
lis <- new(ListWidget,"title of widget")
Bringing all these points together we can make a dialog for factor analysis with very few lines of code.
	#make dialog
	dialog <- new(SimpleRDialog)
	dialog$setSize(500L,400L)
	dialog$setTitle("Factor Analysis")

	#add variable selector
	variableSelector <- new(VariableSelectorWidget)
	variableSelector$setTitle("data")
	addComponent(dialog,variableSelector,10,400,850,10)

	#add a list for the variables
	variableList<- new(VariableListWidget,variableSelector)
	variableList$setTitle("variables")
	addComponent(dialog, variableList,100,900,450, 420)

	#options for transforming the variables
	transBoxes <- new(CheckBoxesWidget,"Transformation",c("Center","Scale"))
	addComponent(dialog, transBoxes,500,900,670, 540)
	transBoxes$setDefaultModel(c("Scale"))

	#output options
	outBoxes <- new(CheckBoxesWidget,"Output",c("Summary","Scree Plot"))
	addComponent(dialog, outBoxes,680,900,850, 540)

	dialog$run()
This looks perfectly pretty, but doesn't actually do anything. We need to be able to translate GUI selections into runnable R code. To do this we register two functions with the dialog.
The check and run functions are R functions available in the global environment that take one parameter representing the state of the widgets upon hitting the "run" button. The check function makes sure that the selections are valid for the particular analysis. If all the options are valid, the check function should return an empty string (i.e. ''), otherwise it should return a string representing a message to be displayed to the user. The run function constructs the R call and executes it.
The state, as passed to the check and run functions is a named list. The names of each of items of the list are the titles of the widgets.
In our factor analysis example, it doesn't make sense to do a factor analysis on less than two variables, so we will write a function that will throw up a message dialog when less than two variables are in the variableList.
.factorAnalysisCheckFunction <- function(state){
	#make sure at least two variables are selected
	if(length(state$variables)<2)
		return("Please select at least two variables")
	return("")
}
Then we need to tell the dialog to call this function when it is checking validity.
dialog$setCheckFunction(".factorAnalysisCheckFunction")
Next we need to create the function which will take the GUI state and translate it into an R call.
.factorAnalysisRunFunction <- function(state){
	#print(state) #a print statement is useful for debugging

	#make formula
	form <-paste( " ~ " , state$variables[1])
	for( var in state$variables[-1])
		form <- paste(form,"+",var)

	#make prcomp call
	cmd <- paste("pr.model <-prcomp(", form, ",", state$data)
	if("Center" %in%state$Transformation)
		cmd <- paste(cmd,", center=TRUE")
	if("Scale" %in%state$Transformation)
		cmd <- paste(cmd,",scale=TRUE")
	cmd <- paste(cmd,")")

	#always print model
	cmd <- paste (cmd,"\n","print(pr.model)")

	#output summary and plot if asked for
	if("Summary" %in% state$Output)
		cmd <- paste(cmd,"\n","summary(pr.model)")
	if("Scree Plot" %in% state$Output)
		cmd <- paste(cmd,"\n","screeplot(pr.model)")

	#execute command as if typed into console
	execute(cmd)
}
Note the use of the execute function. This takes a string and executes it as if it had been typed into the console. Finally the run function should be registered with the dialog:
dialog$setRunFunction(".factorAnalysisRunFunction")
deducer.addMenu and deducer.addMenuItem add menu and menu items to the command line menu system. We then need to add items to the GUI menu bars. If we are in the windows Rgui, we use winMenuAdd and winMenuAddItem. If we are in JGR we use jgr.addMenu and jgr.addMenuItem.
deducer.addMenu("Example")
deducer.addMenuItem("Factor Analysis",,"dialog$run()","Example")
if(.windowsGUI){
	winMenuAdd("Example")
	winMenuAddItem("Example", "Factor Analysis", "deducer('Factor Analysis')")
}else if(.jgr){
	jgr.addMenu("Example")
	jgr.addMenuItem("Example", "Factor Analysis", "deducer('Factor Analysis')")
}
One thing to note is that winMenuAddItem calls deducer('Factor Analysis') and not dialog$run(). This is done so that the deducer function can handle the graphics device details. If you don't call your dialogs through the deducer function on non-JGR consoles, plotting to graphics devices may not function correctly.
We are now ready to put our dialog into a package and distribute it to the world. As a good coding practice, the dialog creation process should be put into a function, and we shouldn't go through the process of making the dialog until the user calls it. to do this we create a new function (getFactorAnalysisDialog) that returns the dialog if it is already made, otherwise is makes a new one.
Putting it all together we get the folowing fully functional package script for making a factor analysis dialog with no Java code.
makeFactorAnalysisDialog <- function(){
	#make dialog
	dialog <- new(SimpleRDialog)
	dialog$setSize(500L,400L)
	dialog$setTitle("Factor Analysis")

	#add variable selector
	variableSelector <- new(VariableSelectorWidget)
	variableSelector$setTitle("data")
	addComponent(dialog,variableSelector,10,400,850,10)

	#add a list for the variables
	variableList<- new(VariableListWidget,variableSelector)
	variableList$setTitle("variables")
	addComponent(dialog, variableList,100,900,450, 420)

	#options for transforming the variables
	transBoxes <- new(CheckBoxesWidget,"Transformation",c("Center","Scale"))
	addComponent(dialog, transBoxes,500,900,670, 540)
	transBoxes$setDefaultModel(c("Scale"))

	#output options
	outBoxes <- new(CheckBoxesWidget,"Output",c("Summary","Scree Plot"))
	addComponent(dialog, outBoxes,680,900,850, 540)
	dialog$setCheckFunction(".factorAnalysisCheckFunction")
	dialog$setRunFunction(".factorAnalysisRunFunction")
	return(dialog)
}

.factorAnalysisCheckFunction <- function(state){
	#make sure at least two variables are selected
	if(length(state$variables)<2)
		return("Please select at least two variables")
	return("")
}

.factorAnalysisRunFunction <- function(state){
	#print(state) #a print statement is useful for debugging

	#make formula
	form <-paste( " ~ " , state$variables[1])
	for( var in state$variables[-1])
		form <- paste(form,"+",var)

	#make prcomp call
	cmd <- paste("pr.model <-prcomp(", form, ",", state$data)
	if("Center" %in%state$Transformation)
		cmd <- paste(cmd,", center=TRUE")
	if("Scale" %in%state$Transformation)
		cmd <- paste(cmd,",scale=TRUE")
	cmd <- paste(cmd,")")

	#always print model
	cmd <- paste (cmd,"\n","print(pr.model)")

	#output summary and plot if asked for
	if("Summary" %in% state$Output)
		cmd <- paste(cmd,"\n","summary(pr.model)")
	if("Scree Plot" %in% state$Output)
		cmd <- paste(cmd,"\n","screeplot(pr.model)")

	#execute command as if typed into console
	execute(cmd)
}

getFactorAnalysisDialog <- function(){
	if(!exists(".factorAnalysisDialog")){
		#make factor analysis dialog
		.factorAnalysisDialog <- makeFactorAnalysisDialog()
		assign(".factorAnalysisDialog",.factorAnalysisDialog,globalenv())
	}
	return(.factorAnalysisDialog)
}

.First.lib <- function(libname, pkgname) {
	deducer.addMenu("Example")
	deducer.addMenuItem("Factor Analysis",,"getFactorAnalysisDialog()$run()","Example")
	if(.windowsGUI){
		winMenuAdd("Example")
		winMenuAddItem("Example", "Factor Analysis", "deducer('Factor Analysis')")
	}else if(.jgr){
		jgr.addMenu("Example")
		jgr.addMenuItem("Example", "Factor Analysis", "deducer('Factor Analysis')")
	}

}
For added flexibility, Deducer has facilities for responding to user actions and dialog events.
Dialogs in R: Adding Listeners
Dialogs in R: Adding A Sub-dialog
You are now prepared to make simple dialogs to perform statistical analyses without leaving the comfort of R. For more complicated GUIs it may become necessary to move into Java in order to realize your vision. The next section will illustrate the inclusion of Java into R packages, and more specifically building off of Deducer and JGR.